Teaching Heart Mom

Just a Mom With a Teaching Heart. Find fun activities to do with your kiddos and students (infant to age 10). www.teachingheart.net blog

Monday, February 28, 2011

Meet Modge Podge - My New Friend...


Here he is...  My new friend, Mr, Modge Podge.  I love saying those two words for some reason...  Modge Podge!  I first noticed this little guy at Skip to My Lou on this post.   She takes a plain boring clipboard and with some scrapbook paper and some modge podge, she creates....

So pretty...  Wouldn't these be great end of the year gifts for your students?  Attach a fancy pen and they can keep writing all summer!  The small clipboards are found at the dollar store!  So your end of the year gift would cost you around $1.25 a child. 

My son and daughter love using clipbaords.  They are handy in the car for travel.  I will tear out a coloring page and my daughter can color while I drive.  They are handy for taking a practice spelling test while waiting at the Doctors office or while your other kids play sports.  Kids love them...  You need to get some and some Modge Podge and make them all pretty.

I decided to try Modge Podge for the first time and made clipboards as party favors.  My daughter had a Princess Party and the girls went on a scavenger hunt through the house looking for Princesses....  So of course they needed a little clipboard to mark their princess findings off on. 

I needed to make 12 rather quickly... so I learned lots and will be ready to make some for my home organization system (coming soon).  These ones I kinda slopped together, but they looked cute.  I used pink spray paint to coat the top.  Most people measure the paper, I just eye balled it and cut.  I also personalized it by printing out the girls pictures and names for their boards. I tired a ribbon to the top. 
My daughter has gotten some good use out of hers already.  And it was fun to use "my new friend" for the first time and begin to think of all the cool things you can do with Mr. Modge Podge.


Speaking of Mr. Modge Podge, you have to see Just Between Friends.  At this blog she used scrapbook paper and Modge Podge to make a back splash in her kitchen.  I am in total amazement over how it turned out.  Go check it out!!!

Labels: , , ,

Sunday, December 20, 2009

Elf Family Napkin Rings Place Holders...

I am a busy elf... Getting ready for a Christmas Eve Celebration at my home. Christmas Eve is so much fun to plan. I am having 12 for dinner. It will be an appetizer dinner. I am working on a few surprises for my family. I thought I would share one surprise before the event (most I will post after Christmas)... But this one was so easy and so much fun, I had to share it in hopes someone reading my blog could copy the idea and use it too.
I made these cute little Napkin Ring Place Holders... The two above are samples of the 12 I made (one is my brother and one is my cousin). All you need is a picture of a family members head. Cut it out and glue this little elf hat on top:
Then get an empty paper towel roll, a knife, tape, glue, and wrapping paper.
Cut the paper towel roll with the knife.
Wrap each mini roll with paper and you have a ring...
Now glue your elf head on the ring and stuff a napkin inside and you have a cute festive napkin ring that may make some of your guests giggle. This took me 45 min. to complete 12 rings start to finish.
If you use the idea, please let me know. What fun crafty things do you do to make the holidays fun and festive at your home?

Labels: , ,

Thursday, November 19, 2009

Turkey Shirts


These are shirts I made my kids for Thanksgiving last year. I LOVE iron on computer paper and I make all kinds of shirts, pillowcases, totes, and even underwear with it. For this shirt I found paper that the kids can color with regular crayons before you iron on the image (found it at Michael's). So I printed out a Turkey on the paper and had my son color it. Then I ironed on the image he colored on one side and on the other side I used a Thanksgiving graphic and typed out the words, I am thankful for my sister. The kids loved the shirts!

Labels: ,

Friday, November 13, 2009

Time For Snowman Soup

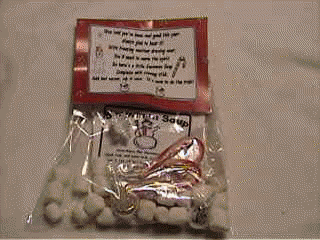
Snowman Soup is basically hot chocolate with a cute snowman twist. A poem like the one below is attached to a bag with a hot chocolate packet, candy cane, and marshmallows.


When it's so cold that
you holler and whoop,
It's time to bring out
the Snowman Soup!
Pour the packet in a mug.
Add marshmallows too.
And throw in these kisses
that are special just for you.
Now add some hot water
and use the cane to stir it.
Sip slowly and soon you'll
feel the warm winter spirit!

The labels for the hot chocolate packet and the cover to the one above can be found for sale at
http://www.teachingheart.net/snowmansoup.html

This year I made up a more personalized version for my son & daughter to hand out tho their friends and for my son to give as his special treat to his classmates. It is below.

The supplies I used are below: Purchased the Wilton Lollipop bags at Michaels for around $1.99 for 15. I like these bags because they have little ties already on them.
Little snowflakes to attach to the outside of the bag came from Michaels
The chocolate covered candy cane stick and the marshmallows were purchased at Oriental Trading
The hot chocolate is just regular packets with labels I made placed on both side. I purchased computer sticker paper and printed the labels on the paper.
The outside I attached this personalized poem:

When the weather in (place name of town here) is frightful,
Snowman Soup can be delightful.

So, Snowman Soup I am sending your way,
Because having you as a kindergarten classmate has made my day!

Being a Kindergartner at (place name of school here) – can’t beat it.
Being away you will probably need something to warm that “(mascot name here)” spirit!

Snowman Soup I have here!
Enjoy & I will see you next year!

Labels: , ,

Tuesday, October 20, 2009

Daddy Birthday Poem

My favorite man turned 36 the other night... The kids had fun making the hand print frame above. They both made a hand print and selected a favorite picture to place on the frame... I wrote the poem and printed it on a printable overlay:

Ten fingers waving to say, "Yeah!"
Our Daddy is 36 today!

C says, I love Daddy to play horsey with me!
Z says, Daddy and I love watching the Penguins and Crosby!

Daddy, our hands will continue to grow and bigger we will get.
Still we will always love you more than you can ever bet.

Hold us always in your thoughts and remember when we are apart,
You can look up and see our hands and know you hold our hearts.

-- Something for Daddy to display at wok and it was fun and easy to make!


Labels: , , ,

Monday, October 19, 2009

Playing Footsie with Witchie

I saw a cute craft idea over at Ramblings of a Crazy Women... I love little crafts you make out of little feet tracings and little hand tracings. I always have my kids make reindeer's on the holidays out of their cute feet and hands. So when I ran across this craft idea, I tweaked it and made it a little different and got my kiddos to make two cute witchies from two cute footsies. Ta-da!


How to make your little Footsie Witchie...


Trace your Kiddos Foot.

Draw a hat to match (or for the older one's, let them draw the hat)

Color Both the hat and the foot black.

Cut out a green circle, Two green rectangles for arms, a red long rectangle for a stick

Use hay for the bottom of the witch's broom

Glue it all together and add eyes and a mouth. The kids had Halloween stickers and gave the witch something to hold in her other hand.


Don't forget to write your kiddos name and age on the back. Pack them away with your Halloween decor and get them out every Halloween and play Footsie with the Witchie. Put your kiddos feet on the witch each year to see if they have grown!


Hey have you read Room on The Broom yet? This would be a fun read before or after you do this craft. Here is a fun idea to match that story and that would go along with this craft.


Labels: , , ,

Tuesday, September 1, 2009

Dress Up a Tray of Cookies!

Just a fast, frugal, and fun idea I came up with when I did not have a paper plate to put cookies on that I wanted to share with a neighbor...
When you take yummies to share, make you own plate that matches a theme. All you need is a piece of cardboard. Wrap the cardboard with wrapping paper and then decorate it with stickers.
I used back to school stickers on my homemade tray.
Then place your yummy in the center.
Wrap the tray. Add a bow and a card if it is a gift.
We made ours for a neighbor who has shared many of their home grown veggies with our family.
Ta-da, you have pretty plate you can leave at the party with the leftovers on.
Just think of all the themes you could come up with.

Labels: , ,

Friday, May 8, 2009

Time to Play Outside...

I know I will take this statement back mid July; but, I can't wait till school is done for the year and we can be outside more. I love the summer months. I am really lucky to have a great group of girlfriends (some will love me for the pics. on this post) who enjoy park hopping with their kids. It's so much more fun for mommy to go to the park with mommy friends. It's funny how I can stay at the park over two hours when I have some mommy friends with me. If I go alone, my kids are lucky to get to play 30 minutes before I am ready to move on.

Many days we pack a lunch and let the kids eat at the park... this equals no clean-up at home... ahhhh, just another benefit of the summer months. Many of us smart mommies pack an outside box we keep in our car. My box usually has chalk, balls, parachute, towels, trucks, bubbles, Frisbees, and other outside toys.

Our Spring so far has been lacking in the good weather department, so I am even more looking forward to outside time. In the spirit of the summer that is coming, I wanted to share some idea/links I have been saving that all deal with outside fun...

Adventures of a Flake shares this outside fun idea... Throw some large paper up on an outdoor upright surface and let the kids create outdoors.

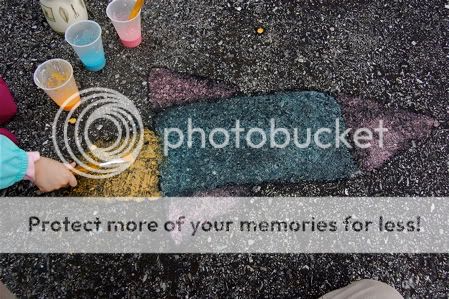
Frugal Family Fun Blog tells us how to make our own sidewalk paint. I promised my son we would try this... Put on your favorite pair of flipflops and surf on over to Flipflops and Applesauce to download the street sign scavenger hunt printable.

Keep those tin cans! Add some string and some sticky foam stickers and let the kids make their own stilts. Crafty Suzanne can tell you more!!! This would be a fun birthday party craft for an outdoor birthday party!


Check out the cool scavenger hunts at Christian Parent.
I think I will add a puzzle to my outdoor park box after reading this;
Jigsaw Puzzle Hunt
Get a kid's jigsaw puzzle that has large pieces (20 or less is optimal). Hide the puzzle pieces all over the play area. Kids have to find the pieces and put the puzzle together to win. If you want more than one team to compete, paint the backs of each team's puzzle pieces a different color.

Bubbles, Bubbles... We use these so much. I usually buy my bubbles at the dollar store. However, I am considering making my own bubbles with the recipe and ideas at Make and Take.

No Time for Flashcards shares the idea of a outside toy car wash. I have even had my kids wash the back of the house to keep them busy. Sometimes I give them real pain brushes and some water and have them paint the porch or swing set with water. Another idea I have seen is an outdoor baby doll bath.


I love, love, love these great ideas at Family Fun... Go check it out. You know I will be making those special dice!

Kids love the parachute... Moogie shares great parachute games. I'll bring the parachute to the park if someone wants to play these games with the kids.

Looking to teach your child how to play some outdoor games. Check out this list!!!

Time to end with something that made me laugh... probably because I can totally relate... My child attends two bible camps... so yeah, I can relate!!! Go read Six-point summer survival guide for bad (and cheap) parents - Note to my girlfriends... The IKEA idea sounds mighty good... you in?

Labels: , ,

Sunday, March 1, 2009

In Honor of Read Across America Day!!!

At my son's school they were asked to wear a shirt that could be read on March 2nd; Read Across America Day. One of my many loves is iron-on computer paper... so here was another opportunity for me to use some. My son is a huge Star Wars fan and of course he thought we should make a Star Wars shirt. After a few image searches on GOOGLE, this is what we came up with:

It is Yoda holding a book and says "Read You Should" and the other side says "Read and the Force will Be With You!"
This is a shirt he can wear again and again.

Labels: , ,

Wednesday, February 18, 2009

Bingo Dauber Fun!

February teases us a little bit with a few days here and there that look like Spring and then the next day it will snow! February is silly like that! So we are stuck inside on most days, waiting for a time when we can get outside and have some fun. Here is an inside activity that both my six and three year old enjoy.

Bingo Dauber Art Pages can be found at dltk-kids. Print the pages and have your kiddos dauber each page. You will find lots of pages for different seasons and themes.

More Dot Art Pages are found here at Making Friends. There are about five seasonal pages.
Look I made some educational downloads...

For my three year old who is still working on numbers, I made this sheet to help her practice counting.

For my six year old who is learning about basic addition, I made this sheet to help him.

Both you kiddos can complete with the Bingo Dauber. So go ahead and download the two sheets and use them with your students or children.

Also on Amazon.com they have the Do A Dot books. You see my daughter above working on a page from one of them. Basically activity sheets you use with Bingo Daubers. I own one of these books and both my kiddos enjoyed the activities.


I do have to admit that I enjoy the Do-A-Dot books myself!
Now go grab your Bingo daubers... Pass the Bingo Hall and go directly home and share the fun with your favorite kiddo!


Labels: , , ,

Saturday, February 7, 2009

Make Your Own Earrings

Happy Saturday Everyone! Let's try a mommy craft today!!!

I feel so lucky to have such crafty friends... One of the most creative friends I have wrote a special tutorial for this blog! Rebecca at http://jewelryandgiftsbyrebecca.com/ is going to tell us how to make earrings. I will tell you that if I can do this, you can too!!! I have sat with her once before and made two earrings. I did learn I would rather pay her to make them for me... because she is the best and she can make anything; however, I did it with no pain. Check out her site and you will see. Here is Rebecca teaching us how to make earrings...

My name is Rebecca and I’m addicted to earrings. OK there, I said it. Seriously, I really do need a program or something. I even started my own jewelry business to support my need to accessorize. I can’t help but think that adding color-coordinated earrings to your outfit is the easiest and most inexpensive way to jazz up you wardrobe. I have even pulled some of my friends in with me. We had a great time one evening making our own earrings. It really doesn’t take much time. Even if you don’t think you are crafty, you will be able to do it following these simple directions. All the supplies can be found easily at any craft or do-it-yourself store.

Here is your shopping list:

Supplies: 2 Head pins (They are usually sold in a pack of 10 or so) You will need them to be at least one inch long but in some stores you may be able to find them in longer measurements.
1 ½ or 2 inches, tops.
2 Ear wires (They too are usually in a pack of 10 or so)
Beads (vary the colors and sizes for interest). 4mm, 6mm or 8mm are good sizes to get started.

Tools:
Round nose pliers (both the tips of these pliers are round and cone shaped)
Flat nose pliers (these are smooth so they don’t leave a mark on your metal)
Wire cutters
(You can most likely find all of these pliers in an economy tool kit at the craft store. They are also sold individually)

Before you go shopping, I have a few helpful hints for you. You will be better off, if you make sure the metal component or findings that you purchase are sterling silver or gold filled. Avoid buying metal that is not of a higher quality. When you are selecting your beads, go for glass, synthetic gems/stones or natural shells. I avoid plastic beads because most of them just look cheap. Swarovski crystals are at the top of the list for quality with Czech fire-polished beads at a close second in quality with a better price. Beyond that, you will need to be careful that you don’t get a pressed glass, which can sometimes have a seam around the edge, or some cheaper beads that may have inconsistencies in their coloring. This is from the method that is used in the production of the bead. Some are just sprayed or painted with color and that can actually rub off with frequent use. Better quality beads are made from colored glass or coloring that has been fired onto the surface of the glass.

Once you have everything lined up and the kids down for a nap, you are ready to go.
First you need to decide what sizes and colors you are using, and get them in the order that you like best. I usually put the larger one on the bottom and then gradually get smaller as I add to the design. Or you may want to start small, get big, then go small again. This works best if you keep it symmetrical. You can slide your beads off and on the head pin until you have found a pattern that you enjoy. You should be sure to leave at least a ¼ of an inch at the top on the pin. While you are holding the beads on as tight as you can, bend the top of the head pin down forming a right angle. If you have more than a ¼ inch you can trim that off using the wire cutters. To be sure you are safe; hold the earring and cutters partially in the wastebasket and turn your head away while you cut. Those end pieces can fly when they get snipped off.


Now you are ready for the next step. Find your round nose pliers and hold them in your dominant hand. Hold the earring in the other hand with the pin that you bent pointing right at you. Using the pliers, pinch the end on the pin as close to the edge as possible and roll it and the pliers up and away from you, stopping half way. Reposition the pliers and continue to roll the pin around the nose of the pliers until you have formed a loop at the top on your bead design.


Find your ear wire and using the flat nose pliers, open the loop at the bottom by bending or twisting it to the side. Thread your beaded pin onto this open ring and use the pliers to bend the ear wire closed again. Ta Da! You have one earring. Now do it all again and you’ll have yourself a custom pair of handmade earrings. Here are some of the ones I have on my web site.


Thanks Rebecca for sharing the love of your craft with us! If you try this at home, leave a comment and let us know how it went! If you have purchased from Rebecca in the past, leave us a comment about how you liked your item!!! I am sure she would be thrilled to hear from you!
Now go get your craft on!!!

Labels: ,

Sunday, November 2, 2008

In Love With Perler Beads!

Guess what I am going to tell you about??? You guessed it, another craft that mommy sets-up and the kiddos do! With Perler Beads your kiddos can create really cool designs with little plastic beads that can be strung together, or melted together with an ordinary household iron (Mommy does the iron part)! This is probably best for ages 5 and up because it uses lots of fine motor skills... It's something you need to try first to see if they can do otherwise I can see this craft being more frustration than fun. Still I found a way to get my 2 year old into these little beads too & I will tell you about it in this post!

My mom brought my son these beads that came in a small pack (she found them for .99 cents at Michael's Craft store) and once complete make Halloween characters: witch, Dracula, and Frankenstein. My six year old isn't the greatest with fine motor skills so I was a little bit skeptical when we started the craft... I had visions of me having to sit with him while he dropped the tiny bead onto the peg board. I did sit with him for only about five minutes until he got the hang of it. Before you know it he was following the pattern himself and very proud of his finished work. I looked at my watch when he was done with one of them and said, awesome 20 minutes of quiet time for mommy that made my little man happy!!! It kept him busy in the afternoon while working on his fine motor. He loved them and wanted to do more. I NEEDED TO FIND ALL THE PERLER BEADS IN THE WORLD and buy them before others got wind of this great craft.

Luckily I found buckets full on Amazon. He made a list of all of the relatives he would like to make one for and give them as Christmas gifts. We attached suction cups to them and they look great as sun catchers. My son made his list and now we wait for our Amazon order to arrive.


Below are some of the things I may order:


Now of course my little princess needed some beads and luckily she was happy with a muffin tin and a cup of beads she could sort by color. The beads are very tiny, but she is good at picking up small things so she enjoyed sorting them by color into a muffin tin. After she finished with the muffin tin she was happy just to move the beads from play cup to play cup.
Just thought I would share!

Labels: , ,

Sunday, October 12, 2008

Scarecrow Craft...


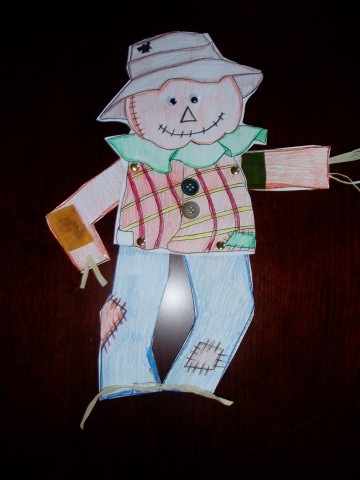
I love scarecrows. Here is a scarecrow pattern and craft off the Teaching Heart Website.

(2 buttons, hay, paper fasteners, 2 fabric pieces, and wiggle eyes)

Have your kiddos make their own scarecrow. Isn't he cute? I was looking all over for a scarecrow pattern that had movable arms and legs. I couldn't find one I liked online or in resource books, so I drew my own and he turned out too cute. The kids color and cut him. They glue on two buttons, two pieces of scrap fabric, wiggle eyes, and hay. They attach the arms and legs with paper fasteners. Then they have their own scarecrow.

You may click here to print my scarecrow pattern (in pdf format) and directions.


OTHER SCARECROW RESOURCES:
Paper Scarecrow Template


Let's Make a ScarecrowA mini book from Teaching Heart for you to print. Cut on the lines and staple the pages together to form a book. Have your kids color. Have them read their book to a friend and an adult. (k-2)


From Let's Explore - Scarecrow Felt Board and Game

POEM TO MATCH:
Title: I'm a Little Scarecrow (I'm a Little Teapot)

I'm a little scarecrow,

Raggedy and worn.

I wear a hat, And a shirt that's torn.

When the crows come, I wave and shout,

"Away from my garden ---- Get on out!"

Labels: , ,